top
Sled Dog Central Your on-line sled dog advertising & information source!
Sled Dog Central Home Page Current Classifieds Advertise on SDC Race Info Search Site Index Contact Us

SDC Tallk!
Discussion Forum

Place Your
Classified Here

DOGS
Dogs that Do It
Fun Photos

MUSHERS
Become a Mentor
Find a Mentor
Interviews

BEGINNERS
Start here..

BOOKSTORE
Buy online

FANS
B.A.R.K.
(Buy a Round
  of Kibble)

FEATURES
Articles
Contests
FAQ
Fun Photos
Trail Groomers
Innovations
Product Reviews
Truck Photos

FIND IT
Classified Ads
Search
Site Index
What's New

LINKS
Artists
Clothing
Clubs & Orgs
Dog Food
Dog Software
Equip & Supplies
Equip: Sleds
Iditarod
Kennels
Merchandise
Mushing Sites
ONAC
Race Sites
Rides & Tours
Sled Dog Schools
Veterinary
Video Links
Yukon Quest
Miscellaneous
Add your link

RESOURCES
Beginners Page
Books & Videos
Bookstore
Kennel Tips
Headline News
Obituaries
Publications
Check it out
Seminars &
    Socials

SDC Talk!
Skijoring

RACING
Check it out Race Schedules
Race Results
Race Web Sites

List Your Race

TRAINING
Training Trails

FUN
Fun Photos
Quiz
Today's Smile
Dude Dog

SDC
About SDC
Advertise on SDC
Contact Us
Privacy Policy

Kennel Tips - Housing


Cheap Dog House
I use 55 gal. plastic barrels, two 2x6 boards 2 ft long. Cut dog opening at top of barrel, then lay on side. Take your two 2x6 boards and cut half circles to fit at bottom of barrel.  Tack on 2 inches from front and same at back of barrel. Use drywall screws and reach inside barrel and screw barrel to boards. Usually 10 screws is enough to hold legs in place.

If you want, add a 2 ft x 4 ft plywood board for top so dogs can stand on.  Bolt these on and use 2x2 board 4 ft long on each side between curve of barrel and under plywood for more stability.

Note: If you use used barrels make sure they are cleaned out very well and don't use if toxins where used in the barrels. I go to janitorial suppliers and get mine for free. So check it out.
Submitted by Robert Sexton, Rathdrum, Idaho

[back to top]


Construction Tips
Our dog houses are of a design we created. The roof is flat and slightly slanted. Each is made from one 4 x 8 sheet of plywood plus some 1 x 3's furring strips for framing. Whether you use a similar design or one of your own, here are two tips you might find helpful:

FIRST, instead of using chunks of 4 x 4's for each corner of the base, use a solid perimeter (such as 2 x 4's) to keep the floor of the house off the ground. This way you won't be having to retrieve toys and bones from underneath the house. Dogs digging to fetch items that disappear in this manner will be discouraged. The more important reason for a solid base is, if you have small puppies living in that house, they can't get stuck underneath!

Our SECOND tip is the use of wood or drywall screws to assemble the dog house instead of nails. It is much easier to remove and replace chewed up panels (door panels seem to be especially vulnerable) when a portable screwdriver can be switched into reverse as opposed to using a crowbar or nail puller to remove more permanently attached sections.
Submitted by Sue Hamilton, SUMA Alaskan Malamutes-Qimmiq Inuit Sled Dogs, Harwinton, CT

[back to top]


Floor Insulation
I recently built a bunch of new plywood dog houses and installed a piece of rigid foam insulation (1" thick "pink or blueboard") under the floor. These houses have recessed removable floors supported by 2x2 cleats on the sides and ends of the house. I simply cut the foam to match the floors and inserted the foam first securing it between the cleats and the floor itself. It works great. The insulation prevents condensation from forming and the straw doesn't freeze to the floor. The houses are easier to keep clean, I go through less straw and the dogs seem a lot more cozy in their houses. Not to mention, fewer calories being spent on maintaining body temp means more available for maintaining weight and repairing tissue.

How ever you attach the foam be sure that the dogs cannot chew on it. My houses rest on 
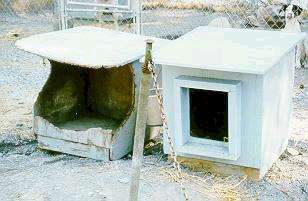
wooden pallets and I haven't had any problems.
Submitted by Al Guggisberg, Fairbanks, Alaska

[back to top]


Keep Dog Houses Looking Good
Every year it seemed like we were having to replace dog houses because the dogs had chewed them all up. Young dogs of course are the worst. This year as I brought dog houses in to replace roofs & fronts and repaint, I decided to outsmart the dogs.

Using a technique I learned when I had horses, I went to the local hardware store and picked up some J-molding and bead-x like they use on sheet rock. The J-molding I used around the roof & the bead-x on the corners. They cannot chew through it and after a couple of tries they stop trying. After making sure there were no sharp edges, I painted the whole house. I have a couple of houses that I had done this with ten years ago and as long as I give them a coat of paint once in awhile they look like new. Houses are expensive and it's nice to keep them in good condition.

Compare Houses

See the difference between the protected & unprotected.

Submitted by Dori Hollingsworth, Seward, Alaska 8/2/00

[back to top]


Plywood House Plans
Submitted by Twila Baker, Pagosa Dogsled Adventures

Since Jon Little's dog house plans are no longer available, I thought we would share how we make ours, based on Jon Little's plans. These plans are for 10 at a time but can be reduced. :-)

Dog House with Feet - Directions for 10 at a time.pdf


Tipi Houses
Check out Eileen Puge's unique tipis for dogs at  Tipis For Dogs
Submitted by Eileen Puge, Fastrk Kennels, Terrace, British Columbia, Canada

[back to top]


top of page  |   home  |   feedback   |  search


Copyright © 1997-2020, Sled Dog Central, all rights reserved.
Sled Dog Central is a subsidiary of Vega Discoveries, LLC
No portion of this site may be published, broadcast, rewritten or redistributed without written permission.
All materials appearing on this site, including the text, site design, logos, graphics, icons, and images, as well as the selection, assembly and arrangement thereof, are the sole property of Sled Dog Central.
Email Us Email